 To ASK US a question
How To Build A Hortons Log Cabin


(Please note that these instructions are unique for Hortons Log Cabins - we have developed our cabins to make them easy for DIY installation with more work being done at the factory so there is less work to be done on site, unlike other manufacturers)
(Refresh or Press F5 on your keyboard to play again. Please scroll towards the bottom of this page to see a full storyboard cabin installation)
-
Log cabins are made of a natural material and it is impossible to guarantee an absolutely perfect finish to every part because of the natural movement of timber. You must therefore expect to be prepared to carry out some finishing/alterations yourself. By definition you must be a competent woodworker and have the appropriate tools (saw, hammer, chisel, drill, etc.). If you feel that you might not be capable of carrying out this type of work then you should look to employ a suitable contractor who is able to do this for you.
- Your cabin will be delivered in one large pack. The first part of the installation process is to unpack the individual items within the main pack and stack them near to the proposed site for the building, at the same time counting the parts and checking them off against the parts list which is supplied with the building. This stage is very important and you should not start to construct the cabin if there are any missing or damaged pieces. If the kit is incomplete you should report this immediately.
-
The diagram below shows a typical excerpt from a base plan supplied with one of our cabins:
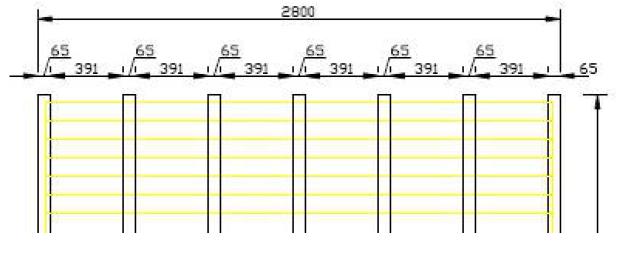
This plan shows a typical floor bearer layout for a cabin with an overall dimension of 3.0m – you should refer to your own set of plans for the exact layout of these for your cabin. If you have an insulated floor, a 19mm thick timber edging piece is supplied to fix along the ends of the bearers to close the ends off (there are no air voids with an insulated floor and therefore no ventilation is required). The interlocking wall log notch is typically set in by 0.1m from each log end, hence the base measuring 2.8m. Please note that the plan shows the spacing between each of the bearers as well as the width of the bearer on plan view. Floor bearers are always laid “flatways” in order to allow for the floorboards to be fitted at the end of the job as described later on. Please note that they are called floor bearers and not floor joists, this is because they are designed to be supported by a sub-base. They are not designed to take the full load and span from one side of the building to the other.
It is good practise to lay a damp proof membrane (DPM) on top of your base before starting to install the building. If the base is over-sized, the DPM should be cut about 200mm larger than the base size required for the cabin, it can then be folded over on top of the floor bearers and trapped by the first course of logs to make it stay in position. This means that should water get on top of your base and under the building, the water will stay under the DPM rather than get on top of it, keeping all of the timber dry. Ventilation holes can then be cut sufficiently above the base level, if required, to keep the standing water at bay. Finishing trims can then be fixed around the edge of the base in order to hide the DPM if required (not provided in our kit). -
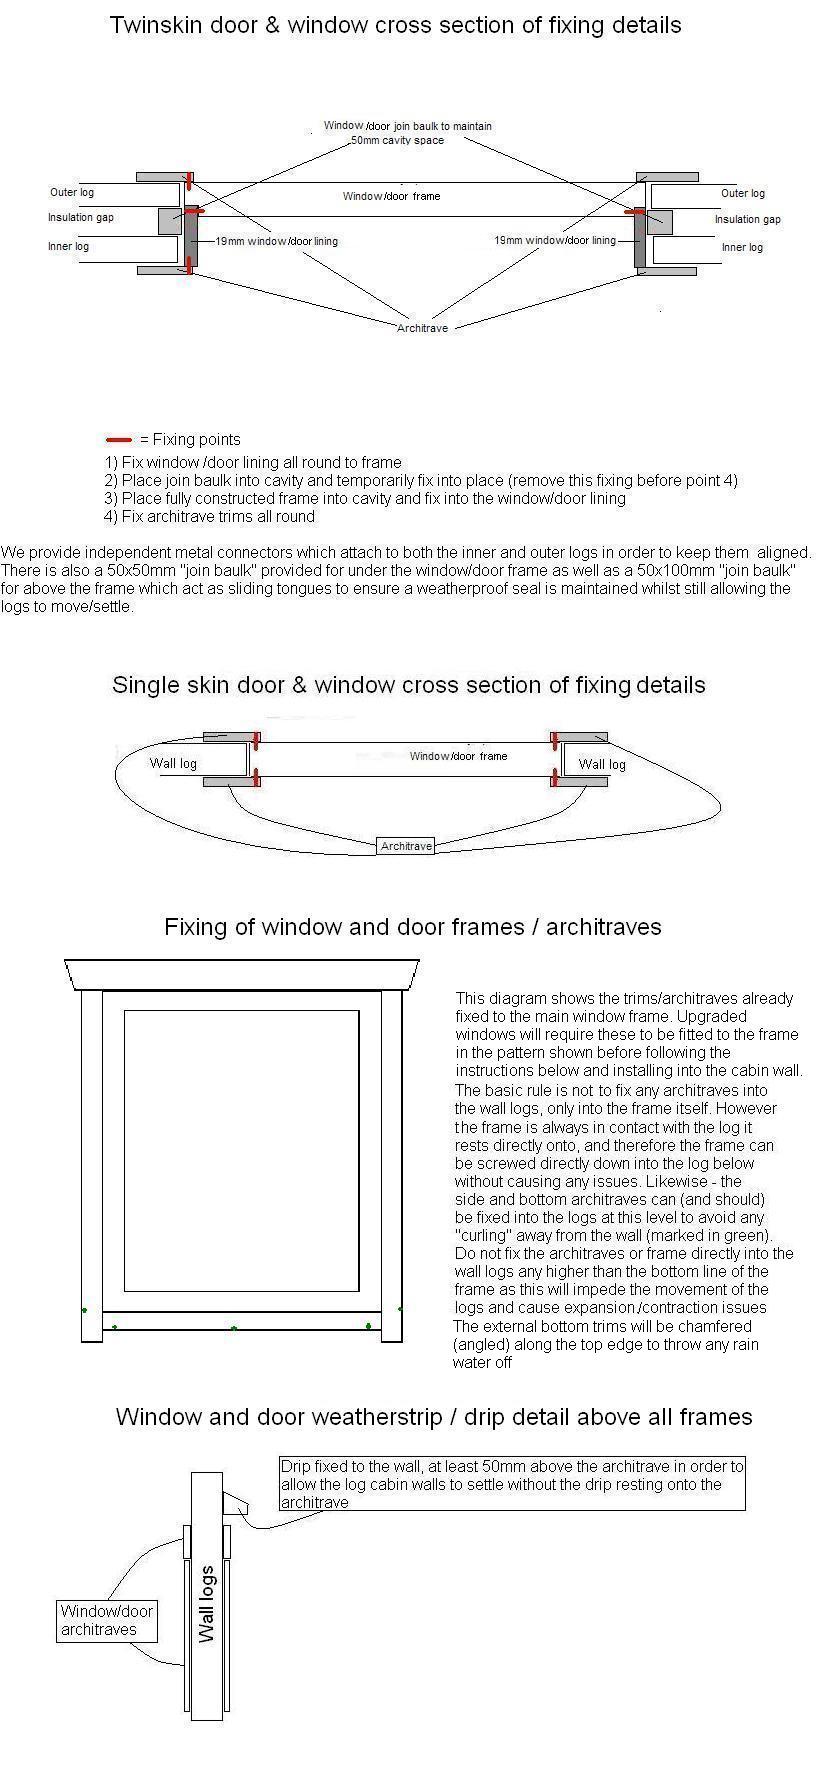
Once the floor bearers are positioned, the first course of logs can be fitted. Log cabins use interlocking joints which rely on a staggered log height, consequently the first course of logs consists of alternating full height logs and half height logs as shown below, cross section B applies to all walls which are at right angles to the logs shown in cross section A (a twinskin has 2 sets of logs for all external walls):

-
Build the walls as shown on the plans provided, sliding the windows and doors into position when there are around 5 courses of logs built up either side of the window/door which help to hold them in place whilst you carry on building (please refer to the extra instructions supplied if you have upgraded ISO windows/doors). You can screw the frames through the bottom piece of outer frame into the log directly below but it is important that you do not fix any window or door frame directly to the logs higher than this. Ensure that all door frames sit directly on top of the wall log underneath (in some cases the internal side door trims may need to be cut down to length). You can use packers to stop any unwanted sideways movement at the top of each of the frames (only use packers on the sides of the frames - they can be screwed or tacked onto the frame to hold everything in place- do not put packers on top of the frames as this will not allow the logs to settled down after the build is complete or during the change of seasons) - there is a deliberate gap either side to allow for final positioning of the frame. If you find that the door lock has the latch pointing in the wrong direction, you do not have to take the mechanism apart to change it but merely either pull the latch out, twist it round and click it back into place or push it in by releasing the gravity toggle, spin the latch around and click it back into place. Alternatively, these items can be fitted into the cabin after the walls and/or roof have been built by removing the rear frame trims, positioning in place and refixing them.
-
If the cabin has over-sized or heavy doors (ie garage doors), then they should be fitted as follows-
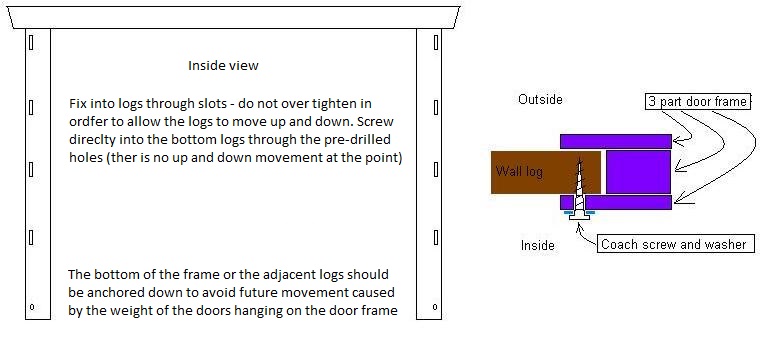
The coach screws should not be fitted until you have finished building the cabin and you are sure that both the logs and the doors/door frame are true and straight. It can depend on the time of year as to where exactly you fix through the slots – the cabin will always settle down after you have built it but it will then also either contract further if you are building in the winter (the building is always slightly taller in the winter as opposed to summer when the logs will dry and shrink), or expand if you are building in the summer. This can always be altered at a later date if the screws get too close or touch the ends of the slots – the higher up the building, the more accummulative movement there is). This fixing method will stop any sideways movement of both the logs or the door frame. -
If the cabin has a wall longer than 6m, then it should be built as follows:
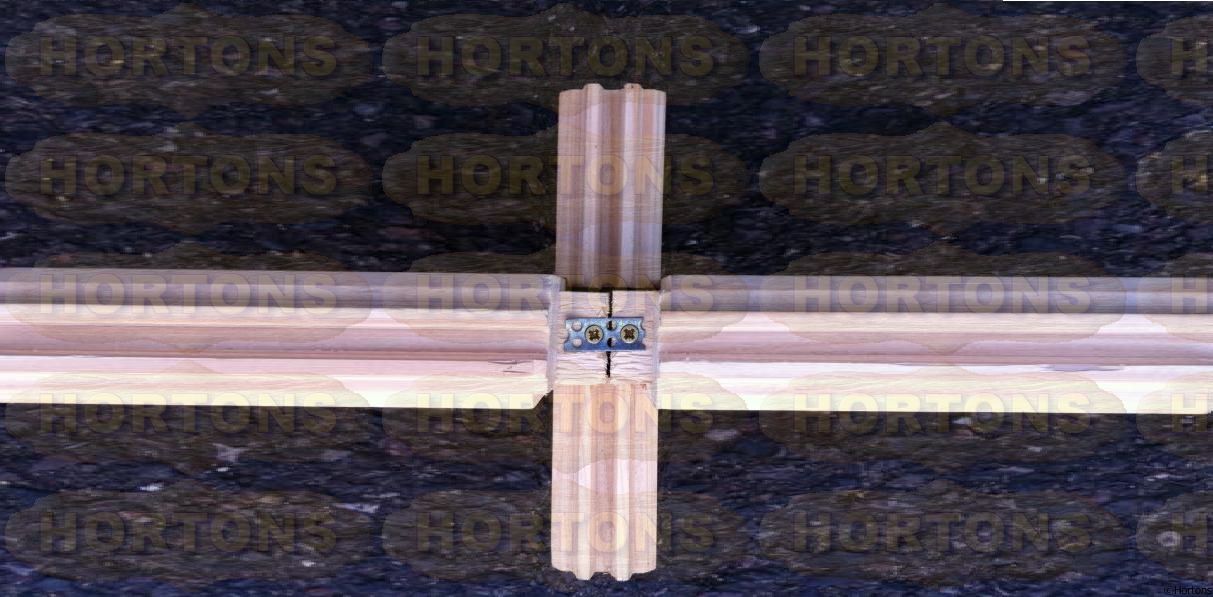
The logs are joined in the middle of a partition wall or portal archway. The metal plate is supplied in long lengths which can be cut to length on site with snips or hacksaw. The joining logs should be tightly clamped and then fixed using a screw through the metal plate either side of the joint which will stop the logs spreading in the future (these screws should be angled away from each other slightly as this will pull the joint together and also increases the pulling strength of the screws). Every course of logs should be joined in this way.
NB- this method is not possible with 28mm logs as the banding is too wide to fit, therefore the 2 joining logs are each pilot holed and screwed into the common partition/archway log with appropriate fixings. - Fit the gable trusses into position and secure by sliding the main roof purlin supports into the appropriate pre-cut notches in the gable triangles. If the gable triangles are supplied in more than 1 piece (sometimes they are too large to be supplied in one large triangle), then each additional piece (whether individual logs or number of logs already fixed together to form the top of the gable triangle) should be glued and screwed to the previously fitted part of the gable triangle (whether they be at either end of the building or an internal archway/partition) using long heavy gauge screws.
-
If you are building a twinskin cabin, 9. slide the insulation boards down into the cavities and trim the excess from the top--
a) It is important not to fill the cavity up to the top of the walls because the walls will settle down and therefore the insulation would be exposed and could force the roof up. We suggest leaving a minimum of 60-70mm gap all around the top. The same rule applies below any windows where the logs could also settle down - leave a pro rata gap depending on how many logs are below the window.
-
(a) If you have an insulated roof/floor, the construction is as follows: (a) If you have an insulated roof/floor, the construction is as follows:
Do NOT build your cabin roof and then try to fit our roof insulation kit afterwards – it is designed to be fitted before the top layer of T&G roof boards are fitted because you will require easy all-round access to the roof area (making the process very easy).
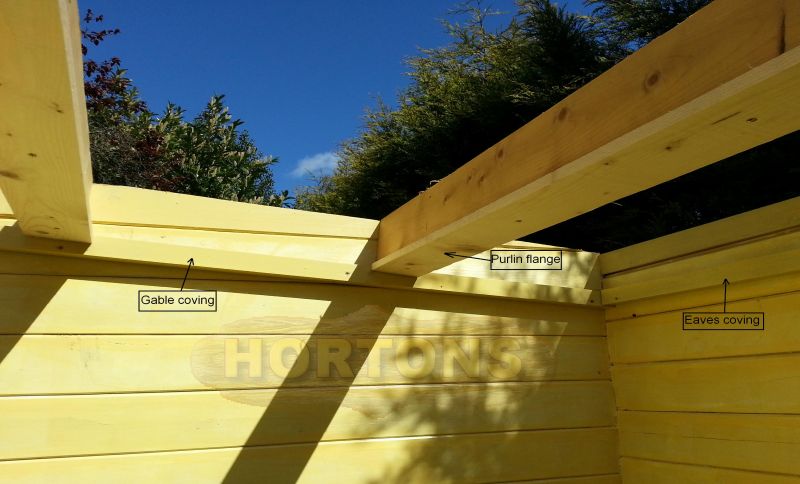
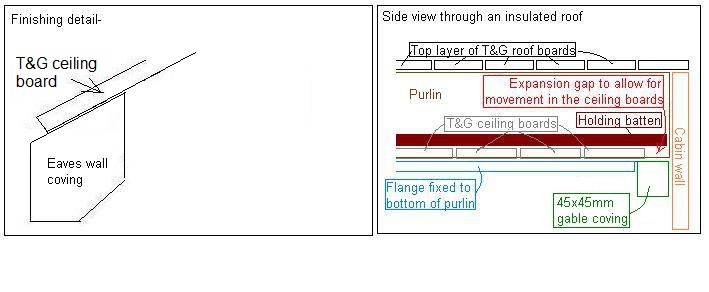
- Fix the gable coving pieces to each end of the cabin. They are screwed to the underside of the purlins and against the cabin wall. These pieces are supplied slightly long and will need to be cut appropriately.
- Screw the eaves coving to the cabin eaves wall, making sure that the top of each end aligns with the previously fitted gable coving.
-
Screw the purlin flanges to the underside of each purlin, making sure that the oversail on each side of the purlin is equal -
-
Place the pre-cut tongue and groove (T&G) ceiling boards into each bay in turn, ensuring that the tongues and grooves are fully interlocked as you go.
-
Once you reach the last piece of ceiling board the end of each bay, go back to the other end and lever the whole section of ceiling boarding away from the cabin wall to leave a gap of approximately 10-20mm. Now return to the other end of the bay and cut the last piece of ceiling board so that when it is slotted into place, it will also be about 10-20mm away from the cabin wall.
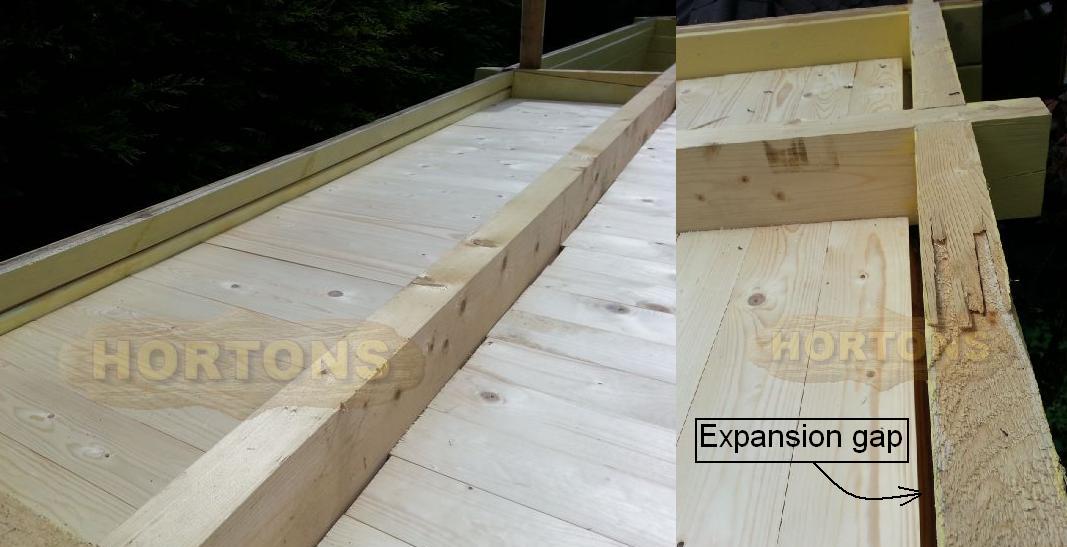
- The reason for the gaps at each end is so that if the boards need to expand - cabins are not generally heated as well as houses and the heat is only turned on when they are in use. Therefore the roof boards will all absorb moisture during the winter months and will probably swell. If there isn't any room for the ceiling boards to expand then they will buckle upwards to give a wobbly ceiling – our system negates this by design.
-
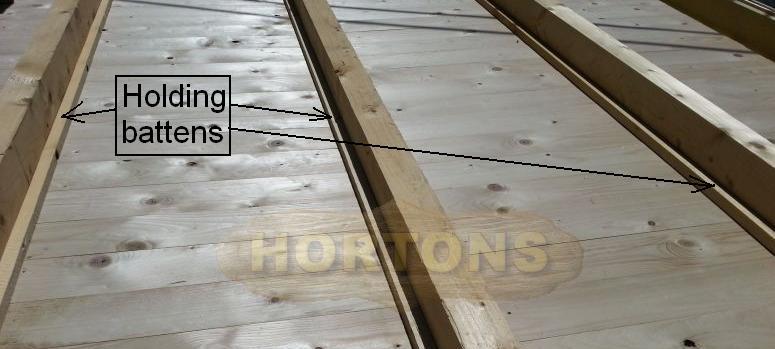
The T&G boarding now needs to be held down by the holding battens. These are screwed into the side of the purlin whilst being pressed down onto the ceiling T&G boards, thus forming a guide rail for the ceiling boards to be contained within but can still swell or contract if required.
 If you are installing electric wires (ie lighting circuit), this is the perfect time to do this as there is full and easy access to all areas required within the roof void.
 - Lay the polythene vapour barrier over the whole roof making sure that there is a good overlap if more than 1 piece is required (ideally over the top of a purlin), and also ensuring that it laps up and over the cabin walls.
-
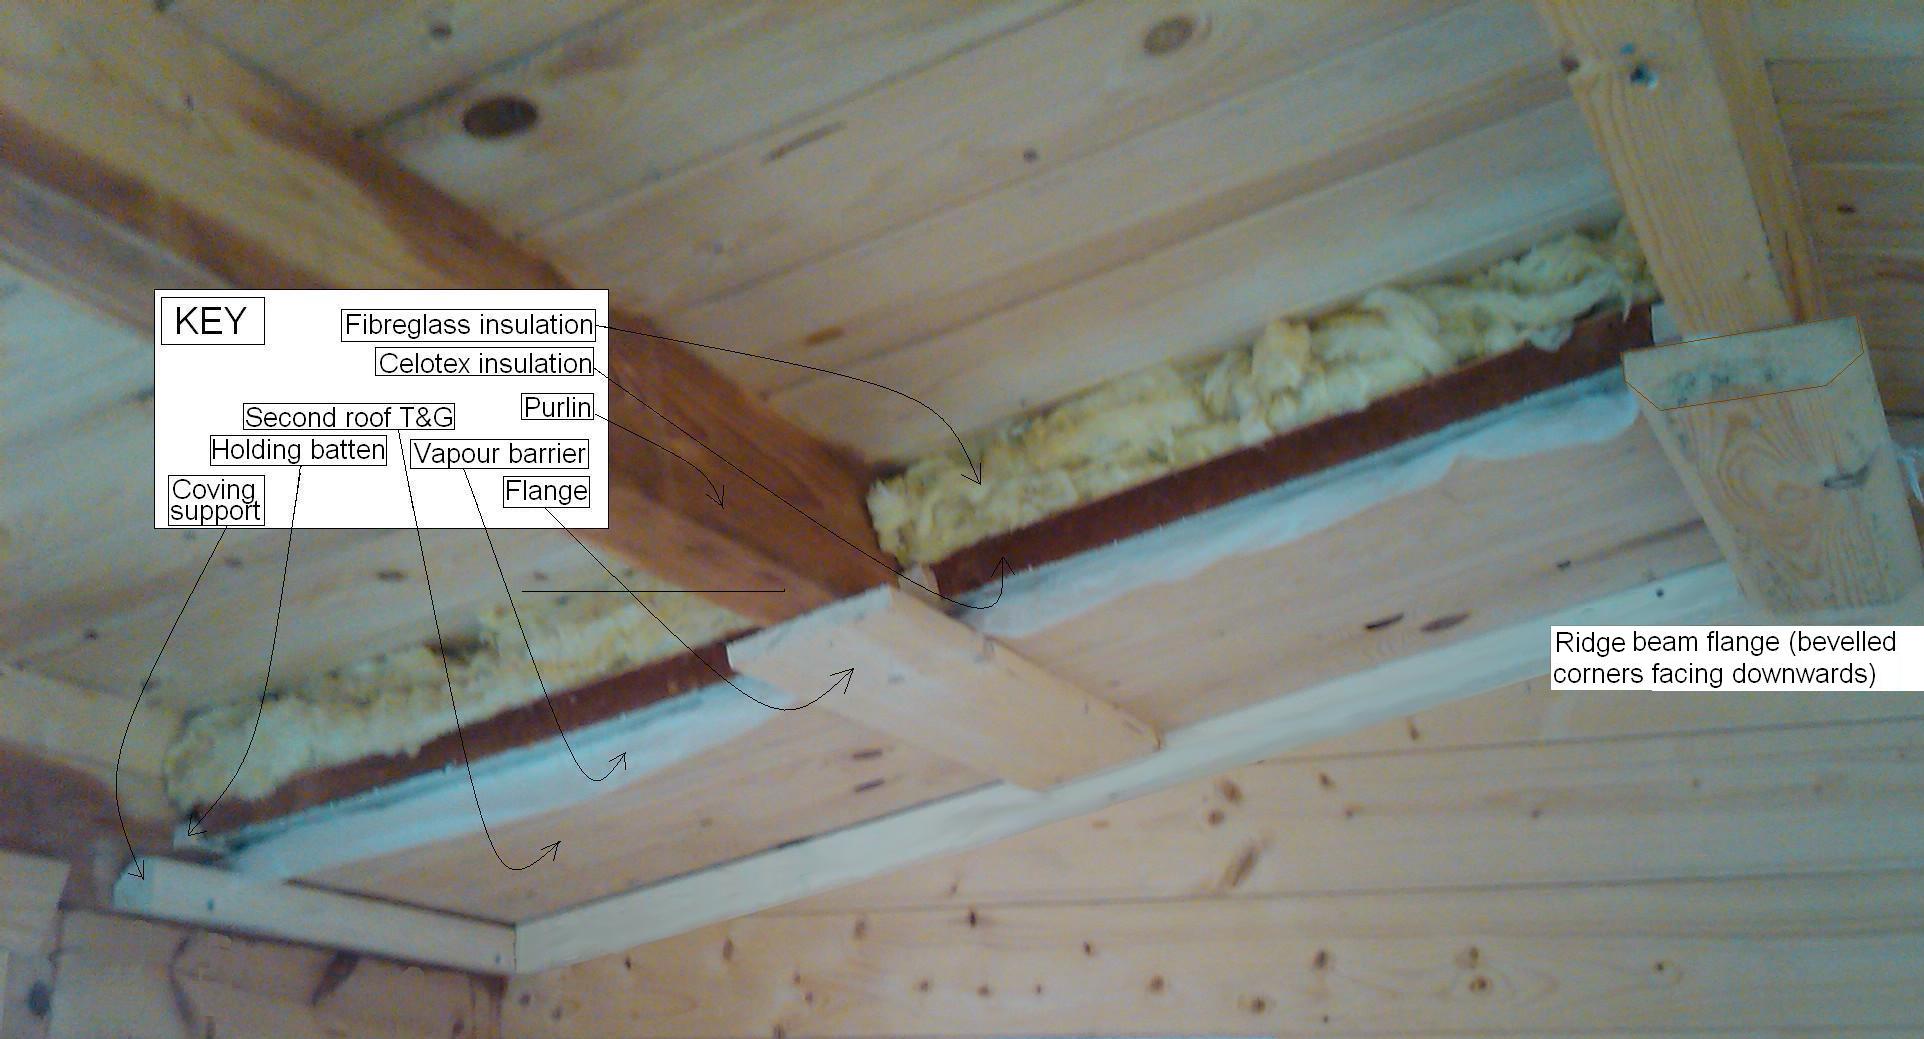
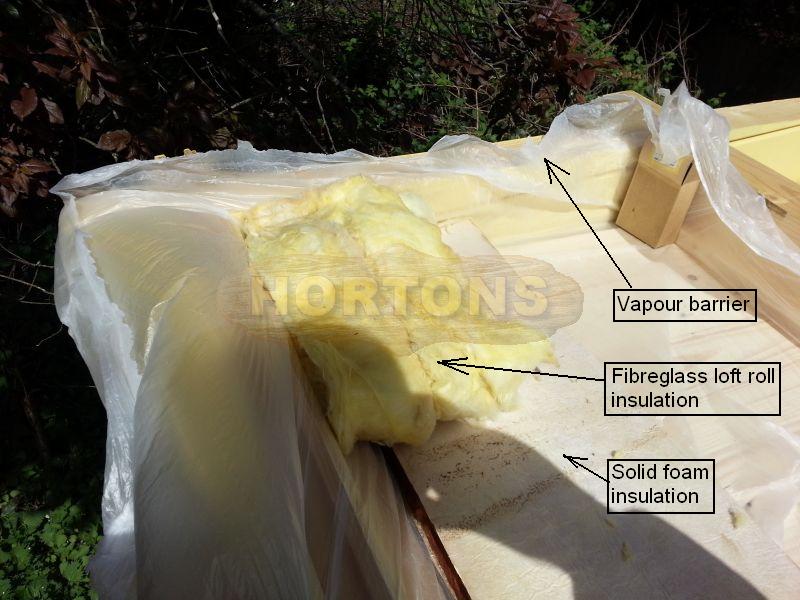
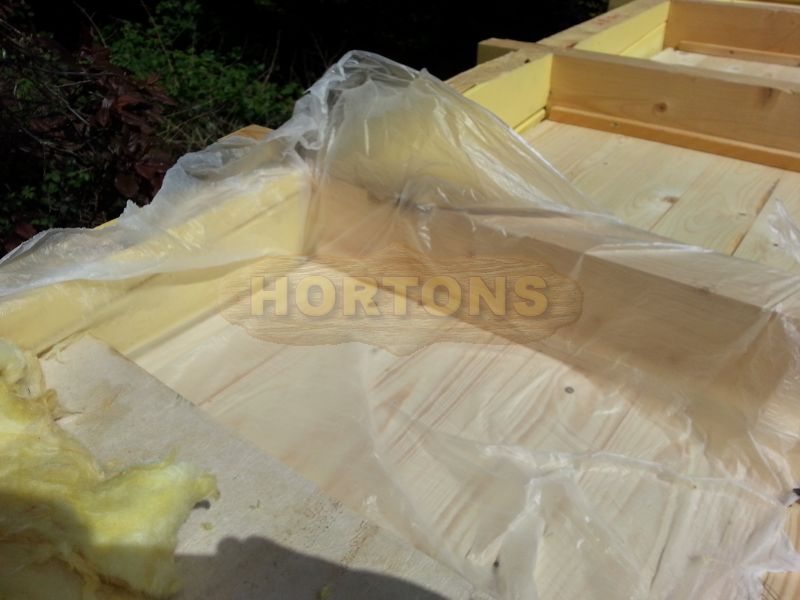 Insert your insulation into each bay, if you have a solid foam board and fibreglass loft roll combination mix, then lay the solid foam board in first (make sure it is a tight fit and sits tight against the ceiling boards), then lay the loftroll on top to fully fill the bay up to the top of the purlins. This photo shows a cut-away version depicting the various layers-

- If you have a cabin supplied with threaded rod, nuts & washers - insert the rods into the pre-drilled holes at the corners of the cabin, using the joining nuts to extend them if required in order to reach the full height of the walls. You may need to countersink the top nut & washer to avoid fouling the roof boards. Make sure that there is enough room underneath to periodically tighten the bottom nut until it tightens no further (usually in the first summer after the installation when the timber is at it's driest).
- Nail the tongue and groove roof boards in place by starting at one end and working along (2 nails in each board at each junction with the purlins), checking the distance covered at the top and bottom of the boards to ensure they are running parallel to the walls (this will avoid cutting a wedge-shaped final board).
-
NB Do not fix the roof boards tightly together as they may swell and cause damage to your roof structure and felt.
-
Fix the side baulk / drip batten to the underside of the protruding Tongue and grooved roof boards along the eaves, this will then form a drip for your felt to dress over (can be used in a number of different orientations as shown on the diagram):
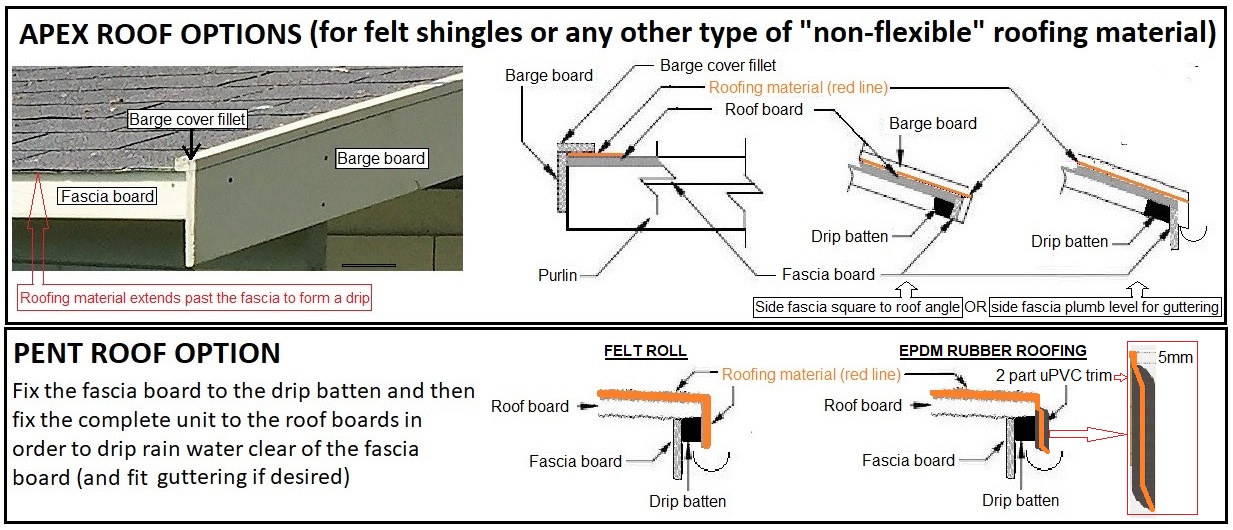
Once the felt roll has been fitted, the barge boards and fascias can be fitted which helps to hold the felt down. (Installation of other roofing materials, ie felt shingles / recycled rubber roof tiles / onduvilla, will vary slightly from the above method - please refer to the installation guide for that specific product if it is relevant) -
Now the building has been weathered in, it is safe to lay the floor without danger of it being exposed to the elements. Use the same principle as used with the roof, ie. start at one end and work towards the opposite wall (2 nails at each junction with the floor bearers), always checking that the remaining gap is equal at either end of the boards to avoid having to cut a wedge shaped final board to finish.
NB Always allow at least an 8mm gap between any wall and the floor boards to allow for expansion. - Fit skirting boards and any finishing trims that are provided.
- Finally fix the clamp baulk / wind bracing as shown below:
<img alt="5" data-cke-saved-src="http://www.bitsandlogs.co.uk/images/image011.jpg" src="http://www.bitsandlogs.co.uk/images/image011.jpg" style=" width=" 520"="">
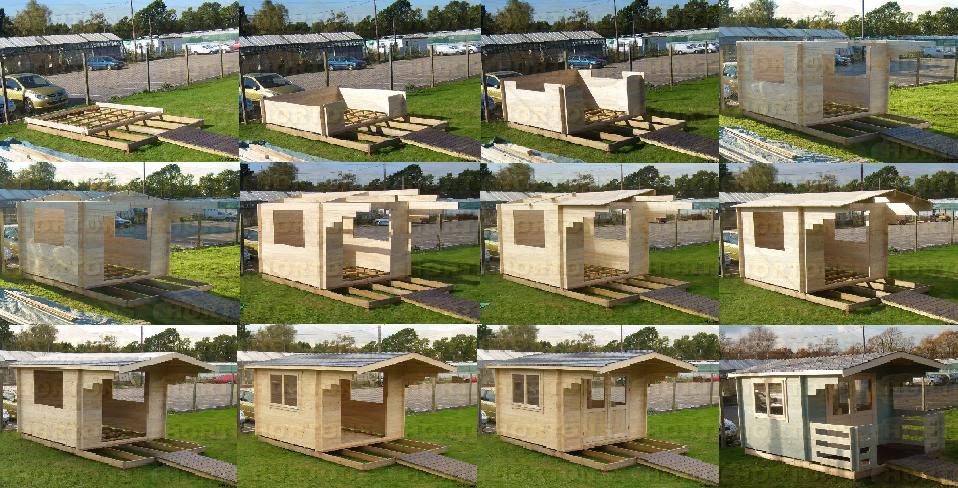
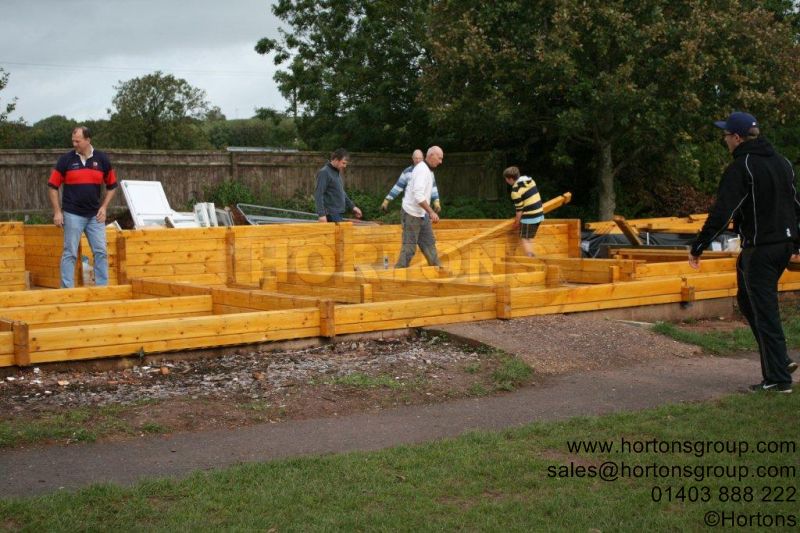
The following storyboard log cabin installation video follows one of our customers (who isn't a builder or carpenter, just an enthusiastic DIYer) and his wife through their installation process. The 7.5m x 5.5m twinskin cabin took them 4 days to build (excluding groundworks and electrics)-
(Refresh your page or press the "F5" key on your keyboard to play again)
Screw/nail pack identifier if you have chosen our fixing kit:-
| Screw/nail pack chart | |
| Pack A | 20mm clout nails for roofing material |
| Pack B | 2.65x50mm nails for fixing roof/floor boards |
| Pack C | 4x80mm screws for insulated cabin inner roof construction |
| Pack D | 3.5x45mm screw packs for windows & door linings/architraves |
| Pack E | If vapour barrier is supplied for the walls (air pressure test required) – corner log to log screws (4x80mm screws) |
| Pack F | If vapour barrier is supplied for the walls (air pressure test required) – cavity 19x38 batten (4x50mm screws) |
| Pack G | Wind bracing (8x40mm coach bolts/washers) AND/OR garage door packs (8x40mm coach bolts/washers) AND double door frame (4x80mm screws) |
NOTES:
Once the cabin has been installed it is very important that it is painted with a high quality preservative/stain immediately (all of the exterior as well as the interior including the ceiling), the exterior coating must also be water repellent.
It is very important that anything fixed in the vertical direction is done so using flexible joints (ie slots) to allow for future log movement (ie- shelving, electrical conduit, cabinets, etc.), and allowing at least 50mm of expansion or contraction gap.
Adjustments: Once built, log cabins will take approximately 2/3 weeks to "settle down", where the height of the building will reduce by at least 25mm. Inevitably this could cause some of the doors/windows to bind slightly, this is easily rectified by using the adjustable hinges to re-align the door/casement. We are not responsible for these adjustments.Sometimes the frames may need re-squaring as well, again this is easily done by unscrewing the 2 internal side architraves, re-squaring the frame (equalling out all of the clearance gaps around the casement/door), temporarily wedge in place, then measure the gaps between the frame and the logs at either side of the frame, cut some packers just slightly less than the gaps (you do not want to wedge it so tightly that the logs are unable to move up and down) and screw or tack the packers into place. Finally remove the temporary wedges and replace the side architraves.
We strongly advise an annual maintenance for every door and window - lift each one off of it's hinges, grease or oil the hinge pins then replace. Also oil any locks. This will ensure optimum performance.
Further helpful hints and advice can be found within the resources section at the bottom of this page and also at http://www.hortonsgroup.com/faqs
Log Cabin How to build a Hortons Log Cabin Available Options
 |
Further information for installing a Hortons Log Cabin | |
| Model Log-cabin-installation |
||
| Full Cabin Spec >>> | ||
| Now From | Call For Price | |